In my second film shoot I filmed The shots to create a jump in the Anderson shelter. I shot some POV shots to look like the character is walking into the room, then standing in the room. The character then see's the note on the far wall, and suddenly turn arounds to see Sledner (when shots are edited together). I then filmed a few panning shots to make it look like the character is turning around, and then a few close up of slender.
What went well
- Costume - the costume that Nick Wilson (playing Slender) wore was exactly the same as in the previous shots of him from film shoot 1 - this is beneficial as it will show continuity and seem more realistic. I also managed to paint the face paint on him the same as before, and used a picture taken from film shoot 1 to do this. This also helps continuity.
- Filming equipment - I used a large adjustable tripod to film the shots. This was very useful as I was able to adjust the height at which I filmed, and to what angle I needed the shots. For example, I filmed some lower angle shots of Slender and some wide angle shots of the Anderson Shelter. This has led to more professional looking and stable shots, and also meant that I was able to hold the torch for lighting whilst filming.
- Lighting - Like in film shoot 1, I used torches for lighting to give the effect that the character is exploring the place them self I used 3 torches and when I was not filming shots of Sledner, Nick helped me hold the torches to give the effect that the person in the room is looking all around and is scared (by unstable/shakey lighting).
- Quality of the shots - Because the lighting was good, the quality of the shots looks much better than in film shoot 1, and this makes the shots look more professional and visually appealing. It also means that when it comes to editing, these shots will be easier to edit if they are clearer.
What didn't go so well
Because I filmed these shots in the afternoon and didn't realise how long it would take to set up everything, it became too dark outside to shoot the shots of the Anderson Shelter exterior and the shots of walking down into the shelter. This shouldn't be a problem though as Mr Taylor said that I can film these shots whenever I need to, and I will not require any actors when I do so.
Monday, 14 January 2013
Thursday, 10 January 2013
Diary update: week 17
Over the past few weeks I have been working on my film plans and filming. Over the Christmas holidays I made alot of progress, and am currently now finding a programme suitable to edit on. I now will crack on and finish my filming, and will post my posts from the past few weeks shortly.
I currently am still not on track with my timeline, however I think that timetabling 5 weeks to do the ancillary tasks is a little too much, therefore giving me more time.
I currently am still not on track with my timeline, however I think that timetabling 5 weeks to do the ancillary tasks is a little too much, therefore giving me more time.
Film shoot 1 : how did it go?
In film shoot 1 I filmed the shots of Slender in the abandoned room. I gathered the shots that when edited, it will look as though he is getting closer to the camera every time the character who's POV it is, takes their eyes off Slender.
I used Nick Wilson to play Slender, and I have taken some pictures of his costume.
 To create the look of Slender (loosely based around the 'Slender Man' myth where he has a white face and no facial features) I used white and black face paints. I used white to look similar to Slender Man (from the myth) and I also used black. I chose to use black around the eyes so that it created strong contrasts and looked more sinister and un-human. I painted Nick's eyelids and when I was filming I asked him to close his eyes, so it looked like the whole area around his eyes (and his eyes) was black. I think this worked well as the lighting for the filming was just a torch, so there were strong contrasts with the face paint :)

Nick's costume was a black suit and a white shirt, the same as Slender in the myth. Here is a picture of Nick before I started filming. Some of the face paint had rubbed off on his eye lids, but when I took the face paint with me to the filming location so I could paint more on as and when I needed to.
The filming went well, and I managed to shoot around 15 shots (I will only use 3 or 4 in my trailer). My idea of using more than one torch worked well because using one torch wouldn't have lit up the room otherwise. The tripod was also useful as I was able to move the torches around, which gave the effect that character who's POV it is was scared and shaking.
However, just as I was filming a few shots for the jump at the end where Slender jumps infront of the camera, my phone battery (which I used for filming on) ran out. I therefore wasn't able to shoot a perfect shot for the jump at the end. This shouldn't be a problem though as I will be doing more filming at the same location soon, and my Slender character will also be in those shots, so I can re-film the jump shots on the same day.
I used Nick Wilson to play Slender, and I have taken some pictures of his costume.
 To create the look of Slender (loosely based around the 'Slender Man' myth where he has a white face and no facial features) I used white and black face paints. I used white to look similar to Slender Man (from the myth) and I also used black. I chose to use black around the eyes so that it created strong contrasts and looked more sinister and un-human. I painted Nick's eyelids and when I was filming I asked him to close his eyes, so it looked like the whole area around his eyes (and his eyes) was black. I think this worked well as the lighting for the filming was just a torch, so there were strong contrasts with the face paint :)
Nick's costume was a black suit and a white shirt, the same as Slender in the myth. Here is a picture of Nick before I started filming. Some of the face paint had rubbed off on his eye lids, but when I took the face paint with me to the filming location so I could paint more on as and when I needed to.
The filming went well, and I managed to shoot around 15 shots (I will only use 3 or 4 in my trailer). My idea of using more than one torch worked well because using one torch wouldn't have lit up the room otherwise. The tripod was also useful as I was able to move the torches around, which gave the effect that character who's POV it is was scared and shaking.
However, just as I was filming a few shots for the jump at the end where Slender jumps infront of the camera, my phone battery (which I used for filming on) ran out. I therefore wasn't able to shoot a perfect shot for the jump at the end. This shouldn't be a problem though as I will be doing more filming at the same location soon, and my Slender character will also be in those shots, so I can re-film the jump shots on the same day.
Tuesday, 11 December 2012
Filming plan 2
Brief about what happens in the shots:
The shots to create a jump in the Anderson shelter. The POV shots are of the character walking down the steps into the shelter, then standing in the room. They see the note on the far wall, and suddenly turn around. They see Slender standing in the corner, and the shot gets wider and longer to show that they are jumping backwards.
Shots:
- High angle shot of steps into shelter
- Tracking shot of walking down the steps
- POV wide shot of room
- Eye line match / extreme close up of Slender
- Tracking shot of walking down the steps
- POV wide shot of room
- Eye line match / extreme close up of Slender
- Fast zoom out to a wide eye line shot of Slender
Date:
Time:
Location:
Equipment:
Lighting = Torch X 2 (1 Yellow light torch, 1 white light torch)
Filming = iPhone 4s, black DSLR camera, tall adjustable tripod, Steadicam
Power = Phone battery, batteries in torches, rechargeable battery in camera
Other =
Actors:
- Nick Wilson (playing Slender) – black suit, white shirt, face paint (white face and black eyes)
Props:
Risk assessment:
Props:
Risk assessment:
The steps into the shelter will probably be slippery as the temperature now is so low that surfaces are beginning to ice over. I therefore will have another person on the side of the shelter (on the grass) to catch anyone if they slip/fall. Surfaces may also be unclear in the dark, so I will check the floor surfaces/loose steps etc. in the daytime prior to the film shoot.
Contingency plan:
- Spare batteries for torches
- Extension lead and lamp ready if I need to use them, as the torches may not be enough light to light the room
Contingency plan:
- Spare batteries for torches
- Extension lead and lamp ready if I need to use them, as the torches may not be enough light to light the room
Letter of land permission : Anderson shelter
As part of my planning & storyboarding, I wrote a letter to the owner of the land that I wish to use. The Anderson shelter will be perfect for my horror trailer. I therefore wrote to the land owner to ask for permission to photograph and film there.
I have attached a print screen picture below of the letter. (click to enlarge)

A few days later, I received an email from Mr Taylor. I have added a picture below of his reply. (click to enlarge)

I have attached a print screen picture below of the letter. (click to enlarge)

A few days later, I received an email from Mr Taylor. I have added a picture below of his reply. (click to enlarge)

Thursday, 6 December 2012
Filming plan 1
Brief about what happens in the shots:
The end shots of the trailer. Slender is standing at the end of the abandoned room and 2 of the characters are shining a torch on him. The characters then look down at their video camera and when they look back up, Slender is closer. The torch then fades and when it comes back on, Slender jumps in front of the camera.
Shots:
- POV / eye line long shot of room and Slender
- POV / high angle close-up of video camera
- Eye line Long / medium shot of Slender in room
- Close up with shallow focus of Slender jumping in front of camera
- POV / high angle close-up of video camera
- Eye line Long / medium shot of Slender in room
- Close up with shallow focus of Slender jumping in front of camera
Date:Tuesday 27th November 2012
Time:
4.45pm (dark outside)
Location:Abandoned mushroom farm rooms/sheds
Equipment:Lighting = Torch X 2 (1 Yellow light torch, 1 white light torch)
Filming = iPhone 4s, tall adjustable tripod
Power = Phone battery, batteries in torches
Other =
Location:Abandoned mushroom farm rooms/sheds
Equipment:Lighting = Torch X 2 (1 Yellow light torch, 1 white light torch)
Filming = iPhone 4s, tall adjustable tripod
Power = Phone battery, batteries in torches
Other =
Actors & costumes:
- Nick Wilson (playing Slender) – black suit, white shirt, face paint (white face and black eyes)
Props:-Video camera that characters hold / film slender on (separate to my filming equipment)
Props:-Video camera that characters hold / film slender on (separate to my filming equipment)
Risk assessment:Will be filming in an abandoned place, so rubble and other rotten materials are trip hazards. I will have to also ensure that in the room I film in, there is no risk of anything falling down whilst filming.
It is also very cold, so I will make sure that my actor has a thick coat/suitable clothing to wear in-between shots/to and from the location.
Contingency plan:- Spare batteries for torches
- If I can’t film some shots, I can film them on another film shoot at a later date (as I will need to film more at the same location)
Tuesday, 4 December 2012
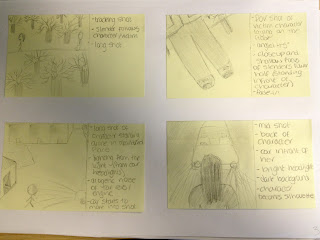
Storyboarding
A storyboard is a sequence of drawings, typically with some directions and dialogue, representing the shots planned for a video. I created my storyboard after I came up with my film synopsis, and have only just been able to post it due to availability of the scanner (which in the end didn't work so I took pictures of the storyboards instead).
I created it on Post-It notes, and found this very useful. This is because I was able to move all of the shots around once I have created them, and could draw/jot down ideas of shots if I suddenly thought of them. I found this beneficial as I was therefore able to create my storyboard not in order, so I could add to it when an idea popped into my head.


I created it on Post-It notes, and found this very useful. This is because I was able to move all of the shots around once I have created them, and could draw/jot down ideas of shots if I suddenly thought of them. I found this beneficial as I was therefore able to create my storyboard not in order, so I could add to it when an idea popped into my head.


Subscribe to:
Posts (Atom)